PICKLE CREEK RANCH
  • Home
    • Contact
  • Cheryl In Texas Art
    • Pixels - Art Prints
    • Fine Art America - Art Prints
    • Redbubble - Art Prints
  • Photography
    • Cheryl's PIXELS page
    • Cheryl's FINE ART AMERICA page
    • Cheryl's REDBUBBLE art
  • Essential Oils
    • Nature at its Best
    • Resources
    • Our Founder - D Gary Young
    • Product Line
    • Monthly Promos
    • Young Living News
  • The Ranch
  • Blog

The Blog Page

Communicating about essential oils, nature, photography, chickens and inspirations along the way.


YLEO SIGN UP

Scented Pine Cones - DIY

11/21/2020

0 Comments

 
Picture
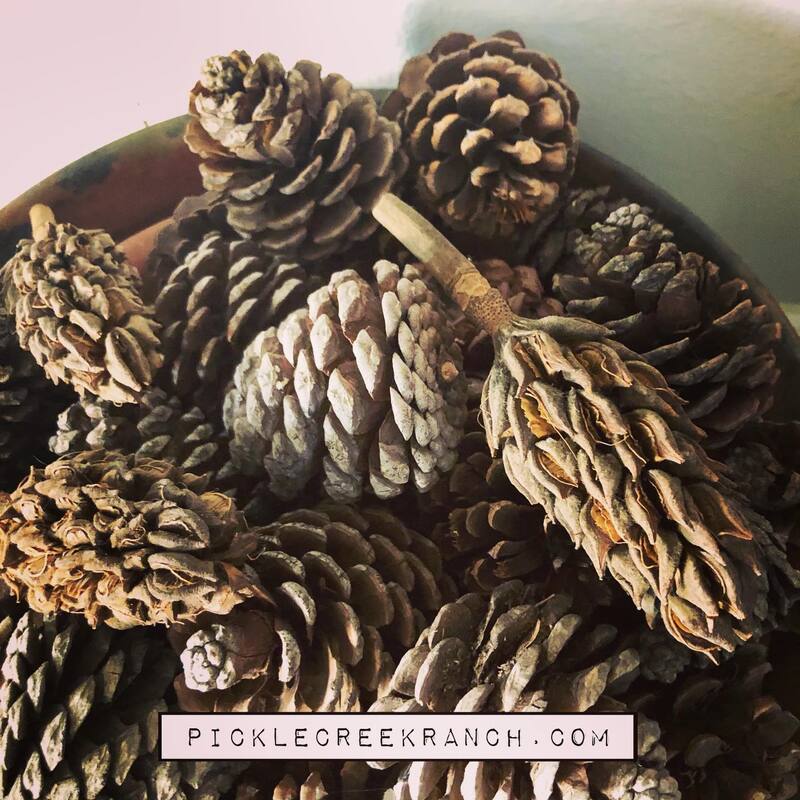
How to Make It | Scented Pine Cones

1) Soak pine cones in water for about an hour to get rid of critters if you got them from outside.

2) Lay the cones out on a foil-lined baking sheet and pop them in a 200º oven for about 30 minutes. This helps the cones open up.

3) Once they have cooled, place them in a ziploc bag. Sprinkle about 30 drops of Cinnamon Bark essential oil on the cones in the bag. Cinnamon Bark and Clove is also a great combo.

4) Let them sit in the bag for 1-2 weeks. Place in your favorite holiday bowl or garland and enjoy an amazing holiday scent.

In case you were wondering ...

A number of behavioral studies have demonstrated that smells trigger more vivid emotional memories and are better at inducing that feeling of 'being brought back in time' than images.

Also, if you have magnolia pods, those can be added as well!

Enjoy!

Cheryl @ Pickle Creek Ranch

0 Comments

Honey Lavender Lemon Ice Cubes

8/3/2020

0 Comments

 
Picture

Honey Lavender Lemon Ice Cubes
by Cheryl L. McClure

Quench your thirst on a hot summer day and keep it chilled with these big ice cubes! They are so good to keep your beverage of choice chilled while it's in your glass. I found the large ice cube trays on Amazon. I like them because they are BPA free and they have a top on them so I can leave the tray in the freezer till I've used up the cubes.

Picture
Ingredients:
1 Tablespoon honey
2 Drops Lavender Vitally essential oil
1/2 cup water
1/2 cup lemon juice
1 lemon

Instructions:
  1. Drop your lavender essential oil onto a tablespoon of honey and dissolve in 1/2 cup warm water. This helps to disburse the oils throughout.
  2. Add the lemon juice to that.
  3. Add lemon sections. Roll your lemon on the counter to loosen up the insides and wash it before cutting into eight pieces. Half them on and then quarter each half. Take seeds out as you go. Squeeze each quarter’s lemon juice into the mixture you have already started and then place each quarter in a section of your ice cube tray.  Stir.
  4. Pour enough of your mixture into each section to fill about halfway. Then go back and add a little more water to bring the level up leaving room at the top.
Picture
Since they float, I positioned the lemon quarters with the skin side up. Freeze.
Picture
Pour over your favorite beverage like Honey Lavender Lemonade, Topo Chico, Zyng or in plain chilled water!

Click this for the recipe >>> Honey Lavender Lemonade

Enjoy!

Cheryl @ Pickle Creek Ranch

essenty.com/cherylintexas


0 Comments

Honey Lavender Lemonade

8/3/2020

0 Comments

 
Picture

Honey Lavender Lemonade
by Cheryl L. McClure

Here’s a simple refreshing drink you are sure to enjoy! Treat yourself to a glass of Honey Lavender Lemonade. It uses Vitality essential oils and Jan Paul really likes the lavender added to it. Lavender Vitality essential oil will add a sweet and slightly floral flavor that will be hard to forget!
🤩
Ingredients
☑️ 5 cups (1180ml) water
☑️ 1/2 cup (160 grams) honey
☑️ 1 cup (240ml) freshly squeezed lemon juice (about 6-8 lemons)
☑️ 2 drops Lemon Vitality
☑️ 2 drops Lavender Vitality
☑️ Glass pitcher
💧
Instructions
  1. Combine lemon juice, honey, Lavender and Lemon Vitality oils into a glass pitcher.
  2. Chill in fridge
  3. Serve over ice cubes and garnish with optional lavender sprigs, lemon slices or mint leaves  🌿
Picture
Adding lavender lemon ice cubes will bump up the flavor as the ice melts! See how to make them here: Honey Lavender Lemon Ice Cubes

Enjoy!
Cheryl @ Pickle Creek Ranch
🥰
To sign up for a newsletter and see more >
essenty.com/cherylintexas

#freshlemonade #lemonade #quenchyourthirst #yltip #yleo #vitality #makeyourown #lavendervitality #summerdrink #fresh

Picture
0 Comments

Fresh Guacamole Please!

5/1/2020

0 Comments

 
Picture

Fresh Guacamole Please!
By Cheryl L. McClure

How's your guacamole? We love it fresh and feel so lucky when we get avacados from the store and cut them at the RIGHT time!! Sometimes they are too hard, sometimes too soft. But wow, when we make a good batch it's so tasty!

I like to halve my avocados and then score them while they're in the shell, then scoop them out.
Picture
One of the things I like to do is add essential oils to my recipe. We live out in the country making a trip to the grocery store, impractical. If I'm growing cilantro, I have it made though! Otherwise, Vitality Cilantro essential oil is the perfect match to flavor my guacamole. I also use Vitality Lemon and Vitality Lime essential oils. Usually a drop or two is enough for two or three avocados but you can start with one drop of each and go from there. As shown below, I make a little well in the center after it's all mashed up, add the lemon juice and then the drops of essential oils. Mix well, season and you're set!

You'd be surprised at the line of Vitality essential oils Young Living produces. They are dietary and can be used in cooking. You can read more on my personal Young Living exclusive website, Nature at its Best.

Picture

TIP

A tip I learned for leftovers: Put your leftover guacamole in a smaller container. Seal the top of it with water. Yes! Add a thin layer of cool purified water to the top before securing the lid and placing in the fridge. It will seal off the air that makes it turn dark brown. When you get it out the next day just pour off the water and mix. I do this when I make a large batch and know we won't eat it all the first time we sit down for lunch.
Picture
Here's the recipe:

3 avocados smashed up with a potato masher
1 or 2 jalapenos minced
1 tbsp Lemon Juice
1-2 drops Cilantro Vitality essential oils
1-2 drops Lime Vitality essential oils
1-2 drops Lemon Vitality essential oils
Salt and Pepper to taste
Handful of chopped cilantro if you have it
Add chopped tomatoes too, if you like that

Mash chilled avocados and add minced jalopenos.
Make a well in the center of mixture and add lemon juice, Vitality essential oils and season with salt and pepper.
Mix together and add chopped cilantro and tomatoes
Now it's ready to serve!

Enjoy!

Cheryl @ Pickle Creek Ranch

yl distributor 1176855
essenty.com/cherylintexas
0 Comments

Instant Pot Cilantro and Lime Rice

8/18/2019

0 Comments

 
Picture

Instant Pot Cilantro Lime and Rice
by Cheryl L. McClure

We love a good rice recipe to eat with Tex Mex here at the ranch and this sounded so good! Not to mention, it tastes good!! Recently, my favorite home & health products company came out with Cilantro Vitality essential oil and I was excited to give it a try in this dish.

We use a 6 qt Instant Pot and it cooks rice perfectly every time so I did not hesitate to experiment and it turned out delicious!! Most recipes for the Instant Pot will use the same ratio for rice as for water, so makes it easy to remember.

We use it for a lot of different dishes, but FYI it's a great appliance for cooking beans from dry to done in no time!

Picture
Anyway, this side dish is so EZ to make but if I don’t have all the fresh spices, herbs and fruits, I have essential oils to replace them, right here in the cupboard!

Here are some of the Vitality line of essential oils that would come in handy for this recipe or to flavor any Tex-Mex meal!

Picture
You can find all these and more at essenty.com/cherylintexas - Use my member number to purchase! #1176855
While the weather was cool in the springtime, I was able to harvest my own from the garden and it was soooo good! I love all the texture and color with cilantro, but I find so often, that I want to cook something with cilantro and I don’t have any, don't have enough or it has gone bad.

We don’t live around the corner from the grocery store, so having essential oils is like having fresh herbs in a bottle! They're ready to use at any time.

It only takes a little, so use sparingly. The good thing is, you can use herbs  fresh, dried or essential oils interchangeably or together in recipes. Don't be a fraidy cat! Experiment with your oils and herbs and adjust to your own taste, just start low and add from there.

Note, you will want to add all your essential oils after the rice has cooked.

INGREDIENTS:
2 cups Jasmine Rice (or long grain white rice)
2 cups chicken broth (or water)
1 teaspoon salt
2 tablespoons butter to add to rice
+
1 drop Bay Vitality (Laurus Nobilis)
1 drop Cumin Vitality
3 drops Citrus Fresh Vitality
2 drops Lemon Vitality
2 drops Lime Vitality
2 drops Cilantro Vitality
1 drop Black Pepper Vitality
1 drop Orange Vitality
Butter or olive oil to mix EOs into

OR use fresh/dry ingredients
2 fresh bay leaves
1/2 teaspoon ground cumin
4 tablespoons of fresh lime juice
2 teaspoons lime zest
1 tablespoon lemon juice
1 tablespoon orange juice
4 tablespoons chopped cilantro
Butter

INSTRUCTIONS:

  1. Butter the inside of the instant pot.
  2. Add 2 cups rinsed and drained rice and 2 cups chicken broth. Throw in 2 fresh bay leaves.
  3. Set Instant Pot manual pressure for 4 minutes, after done, allow 11-18 minutes natural pressure release.
  4. Add butter with essential oils or your fresh/dried herbs, combine all.
  5. Enjoy!
This makes a double batch, about 6 cups, which I like because after I've used it as a side there are leftovers to use in a soup or casserole.

Hope you enjoy this dish and discover more ways to use this great line of Vitality essential oils in cooking. Let me know what worked for you!

Cheryl @ Pickle Creek Ranch
essenty.com/cherylintexas
picklecreekranch.com

If you would like to order any of the essential oils for cooking you can do so through either website, you will just need my member number to order.
CL McClure - Member #1176855

You can order retail or save 24% by becoming a member. I'd be happy to tell you all about it!

Young Living is the leader in the essential oil industry because they have what no other company has, the Seed to Seal promise. I do not recommend any other oil besides Young Living.

0 Comments

MYO Lotion Bars

3/4/2019

2 Comments


MYO Lotion Bars
by Cheryl L. McClure

Picture
Don't you love the scent of soaps and lotions and essential oils? I do! Before I knew about the hazards of chemicals in fake fragrances and fake scents, I was a number one purchaser of those candles, perfumes and household products that you see all the time at the mall, in ads, on tv and such. Not anymore. I am done with that and choose a healthier alternative that I don't have to question and one that I feel good about exposing my friends and family to, because there is no harm in it. It's all good! At least that's what I aim for. Anyway, fast forward to now and guess what? We'll get to the lotion bars, but first this ...
Picture
We - well, ummm actually, I decided to become a beekeeper last year! And I asked Jan Paul to be my partner and I am so grateful he took me up on it!!

One of the ingredients in my lotion bars contain beeswax that we harvest at our  ranch home, Pecan Branch Ranch. If you don't have bees, you can order beeswax online but be sure and get good clean, organic beeswax with no chemicals. After seeing the price of that, it makes me wonder if I should buy it next time. Haha! It's a lot of work to get a pound of wax when you have a small operation but I know where my beeswax is coming from so I will keep doing this. Plus, our home harvested honey is the BEST and you gotta have honey to get the wax!!
 
The first time we got our bees it was in April; a full hive and a nuk. It's all greek if you don't know about beekeeping, as we learned new terms along the way of this journey. To make a long story short, we harvested honey in July!! Our granddaughters were here and we had the best time. Once we did that, we were hooked. We want to do it again in spite of Jan Paul having to go to ER because of a reaction from multiple stings and losing one of the hives for whatever reason. We have done everything we know possible to overwinter our remaining bees and will start again in the spring. It's a learning curve for sure.

Picture
So.... one of the fruits of our labor is beeswax. FYI, this light and golden color beeswax comes from the frames we harvested honey from. Darker beeswax is typically harvested from what they call brood comb, where the eggs and bees are hatched. No less valuable, it's just a darker color.
Once the frames have been scraped and the honey/wax chunks placed into a filter, the honey drips out and is separated. We have a 5 gallon bucket with a gate at the bottom so we can then release the honey into jars. The remaining wax is washed and melted in water to separate the gunk from the wax. That whole step starts in a large crock pot, using a paint filter to put the rinsed wax chunks in and cheesecloth to keep it above the water as it melts through the mesh. (I tie the cheesecloth to the handles on the crock pot.) You usually have to go through that process at least twice to get the wax clean.

As it hardens in the water, it will release from the sides and form a solid block. You can see two wax disks in the picture, one light and one dark. After hardening, smaller pieces can be broken off and weighed for your recipe.

MAKING LOTION BARS
When I get ready to do the lotion bars, I boil water in the tea kettle first, pouring it into the crock pot, setting it on high. It's heated faster and now ready to melt the wax. I have a designated sauce pan for making lotion bars. This is what I put on top of the crock pot full of hot water. If you are out and about, you might see one at a garage sale and pick it up at a reasonable price. It's also good to have a crock pot designated for your wax type projects.

If no one has ever told you, WAX IS MESSY. I do everything I can to keep from getting wax on the floor or on the countertop. So whatever you do, prepare for that!!

Once the wax has been measured and melted, I add the other softer ingredients to melt all together in the sauce pan. Once all of those are melted together, I will add essential oils. Stir. And then pour into the mold.

I position this cute bee mold on a foil lined baking sheet because I don't want wax everywhere in case I spill it. Once I fill each mold it doesn't take long for the bars to harden. They can be popped out of the mold, placed on deli paper sheets and tucked into a 2 oz tin that has a screw on lid. I like using the paper and tins. It makes it easier to get the bar out and put back in, especially right after using the bars on my hands. The lotion bar is slightly greasy because of the shea butter and coconut oil, but my hands love it and they NEED it, especially in the winter time!

Picture
 INSTRUCTIONS
Measure and melt in this order. melting each product before adding the next:
  • 1/2 Cup (4 oz) beeswax
  • 1/2 Cup (4 oz) shea butter
  • 1/2 Cup (4 oz) coconut oil
  • 40-50 drops of essential oils

Pour into mold, allow to harden, store in a closed container. This recipe should fill your bee mold almost to the top on each one, to make 6. The last time I did it, I was short on the last one so I saved it for myself.

There are many recipes out there but what I found to work well is equal amounts of the three main ingredients that make up the bar. From there, you have variations you can experiment with, like, in place of the shea butter, you could use cocoa butter. You could use use 1/4 C coconut oil and 1/4 C almond oil in place of the 1/2 C coconut oil and so on.

This is the fun part! Choosing your essential oils for blends that you love! I only recommend Young Living essential oils because I know this brand can be trusted. Check out our Seed to Seal Promise and you will understand why.

Try various blends. The 40-50 drops can be a combination of oils such as:
  • 25 orange, 15 clove, 10 myrrh or
  • 10 drops each of orange, patchouli, sandalwood, neroli and myrrh
Mmmmmm! They smell so good.

I hope you enjoy making lotion bars and I'd love to know what variations you use! I have also attached artwork here for you to use on a label. Click on the LOTION BAR graphic to download the label. It's a PNG file so has a transparent background.

Happy Oiling!

Cheryl @ Pickle Creek Ranch
essenty.com/cherylintexas
picklecreekranch.com

Picture
Picture
2 Comments
<<Previous
    Picture

    Cheryl L. McClure

    Young Living Distributor
    #1176855

    I have retired from the corporate world and now enjoy keeping chickens, ducks, working in the garden and cooking more than ever before!

    More below...

    Categories

    All
    Art
    Bathroom
    Birds
    Butterflies
    Cats
    Chickens
    Cleaning
    Community
    Cooking
    Decor
    Diy
    Ducks
    Edible Landscape
    Essential Oils
    Fire Starters
    Free
    Gardening
    Healthy
    How To
    Instant Pot
    Local
    Make Your Own
    Nature
    NETT
    Rainwater
    Ranch
    Savings
    Tools
    Travel
    Volunteering
    Young Living


    ​Blog Posts:
    PV Assistant
    Malabar Spinach
    ​Throne Scents
    Clean House
    Shrimp
    Weight Management
    Black Swallowtail
    Gluten Free Brownies
    Mint Tea
    Hummingbirds
    Minty Cabbage Slaw
    Respiratory Support #1
    Respiratory Support #2
    Respiratory Support #3
    How to Move a Greenhouse
    ​But I'm So Cute!
    Raised Bed Gardening
    NETT Cleanup
    Exercise at the Ranch
    DIY Chicken Treats
    DIY Fire Starters
    Poblano Pepper Powder
    Green Tomato Weekend
    MYO Nitey Nite EO rollon
    Essential Oils and Chickens
    ​Diffusing Essential Oils
    Longhorns at the Pound?
    What's in your Trough?
    Using Rainwater at the Ranch
    Raindrop with Young Living
    Young Living Price Comparison
    Young Living - Beginner Tips
    The Essential Oil Bottle 
    Sage Essential Oil
    Ear Support and EOs
    Crape Myrtle Surprise
    Quick Cat Shelter
    Chemists's Perspective on YL
    The Athlete
    Chicken House Reveal
    Campus Health
    Concentration
    Accidents and Essential Oils
    Young Living Farms
    Kid Scents Collection
    Itchy Skin
    ​Probiotic - Life 9
    Turmeric and AgilEase
    Enjoying the Harvest
    ​
    Diffusing the Ocean Breeze
    The Lavender Farm
    An Ounce of Prevention
    Traveling with Essential Oils
    The North Sulphur River
    DIY Bleach
    Reflection of Tears
    ​MYO Lotion Bars - DIY
    Zucchini Boats
    Instant Pot Cilantro and Lime Rice
    Instant Pot Zuppa Toscana Soup
    Fresh Guacamole Please!
    Instant Pot Tomato Sauce
    Honey Lavender Lemonade
    Honey Lav/Lemon Ice Cubes
    Tools For The Garden
    Veggie Tian from the Garden

    Archives

    November 2024
    August 2024
    May 2024
    April 2023
    December 2022
    July 2022
    June 2022
    March 2021
    January 2021
    November 2020
    September 2020
    August 2020
    July 2020
    May 2020
    February 2020
    August 2019
    March 2019
    January 2019
    May 2018
    February 2018
    December 2017
    August 2017
    July 2017
    June 2017
    May 2017
    February 2017
    January 2017
    October 2016
    August 2016
    July 2016
    June 2016
    May 2016
    April 2016
    March 2016
    February 2016
    January 2016
    November 2015
    September 2015
    July 2015
    February 2015
    January 2015
    November 2014
    October 2014
    September 2014
    August 2014
    July 2014
    June 2014

    CONTACT INFO
    It's probably pretty obvious I love nature and art. Nature and landscape photography is a part of everyday life at the ranch. There are some pieces available as works of art that I would like to share with you!

    I only recommend Young Living essential oils because I am confident in their purity and the quality of their essential oils and other products. I am not a doctor. The information I post on this website is for educational purposes only. Young Living supplements are designed to improve nutrition; they are not intended to diagnose, treat, cure, or prevent any disease. However, scientific research has established a connection between nutrition and we all know better nutrition leads to better health.

    Please consult with the medical professional of your choice whether using essential oils or not. Remember that being proactive and taking responsibility for your health is in your own best interest. Dig in, research and make wise choices. I encourage you to see what others have done with essential oils and supplements by visiting Oil-Testimonials at http://www.oil-testimonials.com/.

    I hope that this website and blog will provide you with helpful information and resources to achieve your desired goals!!
    ​
    Feel free to contact me if you have questions or concerns as I am here to help and hopefully point you in the right direction!​

    RSS Feed

    Go to> • Home • Cheryl In Texas Art • Photography •  Essential Oils • The Ranch • Blog
Web Hosting by iPage
All photography and graphics crafted by Cheryl L. McClure • does not include iPage template